Today I learned a new lesson about FRx.
If you want to change the path of the SYSDATA folder, you should not only change in FRX32.CFG file (which is available in the installation folder of FRx), but also you should change it in FRxConfig.xml (which is available in C:\Users\username\AppData\Local\FRx Software\FRx 6.7)
Friday, July 5, 2013
Wednesday, July 3, 2013
Fixed Asset Disposal in Quantity
One new thing which I learned about GP today is that it is possible to dispose an asset in Quantity too. So, while retiring an asset, you can key in the quantity (instead of value or percentage) for retirement. System will automatically calculate the percentage.
Monday, July 1, 2013
How to setup integration using Integration Manager for integrating Journal Entries with Analytical Accounting Codes?
This solution is
based on the following link.
The below solution is
with a minor modification to the above one i.e., for a Reversal Journal Entry.
(Please note that you need to install 'eConnect Destination Adapters' feature for Integration Manager for this solution. This can be installed using the Installation Setup of Integration Manager.)
To setup integration
using Integration Manager for integrating Journal Entries with Analytical
Accounting Codes, follow the below steps.
- Open Microsoft Excel.
- Prepare the excel sheet with
the following columns.

- Populate data to the above
columns.
- Save the excel sheet as AA
GL Trx.xlsx
- Save the excel sheet as Text
(Tab Delimited) with the file name as AA GL Trx.txt
- Close the excel sheet.
- Open another excel.
- Prepare the excel with the
following columns.
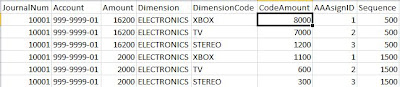
- Populate data to the above columns.
- Save the excel sheet as AA GL Trx with Dim.xlsx
- Save the excel sheet as Text (Tab Delimited) with the file name as AA GL Trx with Dim.txt
- Open Integration Manager.
- Click on New Integration.
- Give 'Integration Name' as GL Transaction - AA.
- Click on OK.
- Click on Add Source.
- Select Text under the folder 'ODBC/Text'.
- Select on 'Define New Text' and click on Open.
- Give Name as 'GL Header'.
- Select the file AA GL Trx.txt
- Select Tab under Delimiter Section.
- Select 'First Row Contains Column Names' checkbox.
- Click on Sorting Tab.
- Select the columns such as Batch ID, JournalNum, TrxDate, RevDate, TrxTyp and Reference under 'Group By' section.
- Click on OK.
- A warning will be displayed, Click on OK.
- Click on Add Source.
- Select Text under the folder 'ODBC/Text'.
- Select on 'Define New Text' and click on Open.
- Give Name as 'GL Distributions'.
- Select the file AA GL Trx.txt
- Select Tab under Delimiter Section.
- Select 'First Row Contains Column Names' checkbox.
- Click on OK.
- A warning will be displayed, Click on OK.
- Click on Add Source.
- Select Text under the folder 'ODBC/Text'.
- Select on 'Define New Text' and click on Open.
- Give Name as 'GL AA Dimension'.
- Select the file AA GL Trx with Dim.txt
- Select Tab under Delimiter Section.
- Select 'First Row Contains Column Names' checkbox.
- Click on OK.
- Click on Add Source.
- Select Text under the folder 'ODBC/Text'.
- Select on 'Define New Text' and click on Open.
- Give Name as 'GL AA Dimension Code'.
- Select the file AA GL Trx with Dim.txt
- Select Tab under Delimiter Section.
- Select 'First Row Contains Column Names' checkbox.
- Click on OK.
- Double Click on 'Query Relationships'.
- Set the relationship as follows.

- Click on 'Add Dest.'
- Open 'Microsoft Dynamics GP eConnect' folder by clicking on + sign next to the folder.
- Click on Financial Folder.
- Select 'GL Transaction'.
- Click on Open.
- Double click on 'Destination Settings'
- Give the database server name for 'Server Name'.
- Give the company database name for 'Company Database'.
- Click on Close.
- Double click on 'Destination Mapping' (or Click on Mapping button in the toolbar).
- Click on 'GL Transaction' folder on the top left hand side.
- Set the mappings as shown below.
- Click on 'Entries' folder.
- Set the mappings as shown below.
- Click on 'Analytics' folder.
- Set the mappings as shown below.
- Click on 'Dimensions' folder.
- Set the mappning as shown below.
- Click on Save button to save the integration.
- Click on Run to run the integration.


Note : Unlike normal integration, this integration will run for the company which is setup in the 'Destination Settings' i.e., you would not need to login to any GP companies to run this integration.
Friday, June 28, 2013
How to export/import integration(s) from/to Integration Manager?
To export integration(s) from Integration Manager, please follow the below steps.
- Open Integration Manager.
- Click on Tools >> Create Database.
- Click on Folder Dialog button.
- Select the location where you want to create the database.
- Give a file name and click on Save.
- Click on File >> Export Integrations.
- Select the integration which you would like to export.
- Click on Export.
- Select the file which you created in Step 5.
- Click on Open.
To import, please follow the below steps.
- Open Integration Manager.
- Click on File >> Import Integrations.
- Select the .imd file which is exported from Integration Manager.
- Click on Open.
Thursday, June 27, 2013
Shortcut Key to open Dynamics GP
To setup a shortcut key to open Dynamics GP, follow the below steps
- Right click on Dynamics GP icon (which is available either on Windows desktop or in Start menu).
- Select properties.
- Click on Shortcut key.
- Press the key combination (for eg. CTRL + ALT + G) which will be used to open Dynamics GP.
- Click on OK.
How to disable/enable Analytical Accounting?
To disable Analytical Accounting, follow the below steps
- Open Customisation Status from Microsoft Dynamics GP >> Tools >> Customise >> Customisation Status.
- Select Analytical Accounting.
- Click on Disable if it is enabled or vice versa.
Wednesday, June 26, 2013
Shortcut Keys for Dynamics GP
CTRL + L
To display lookup window
ENTER
Will execute the default button in GP Window. Most of the GP windows are having SAVE button as default button. Hence, hitting an ENTER button will save the record (which is same as clicking on SAVE button)
ALT + F11
To open Visual Basic Editor
CTRL + F11
To add current window to Visual Basic
SHIFT + F11
To add fields to Visual Basic
ALT + F9
To open Report Writer
CTRL + F9
To modify current report
CTRL + A
To select all text in a field.
CTRL + C
To copy the selected text.
CTRL + X
To cut the selected text.
CTRL + V
To paste the copied text.
ALT + F4
To close a window.
CTRL + P
To print an Edit List.
Subscribe to:
Posts (Atom)